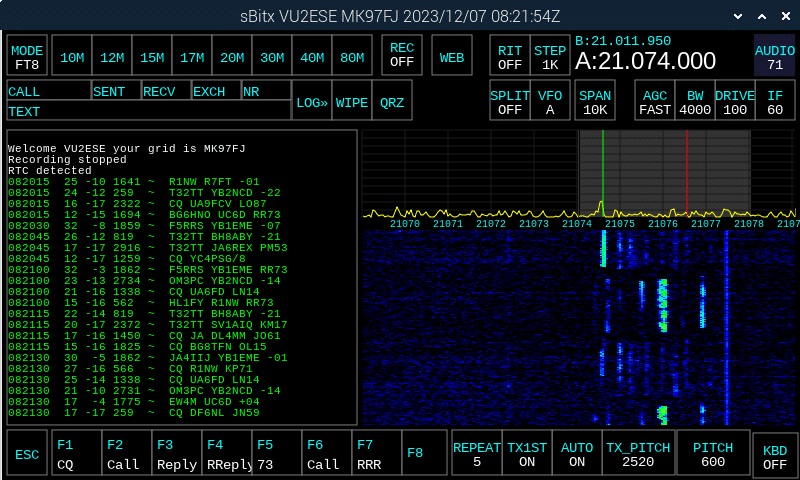
FT8 setup is often considered complex, especially on traditional radios, which typically require configuring multiple connections between the radio and a computer, including three separate wires for Mic, Speaker, and CAT control.

With the sBitx, however, setup is straightforward.
In FT8, “frequency” refers to the audio frequency of signals within the 4 kHz bandwidth of FT8’s RF frequency.
For optimal FT8 performance, set the bandwidth (BW) to 4 kHz. This wide bandwidth allows the sBitx to receive almost twice as many signals as standard analog radios and eliminates the need to use the SPLIT function to transmit or receive signals at greater offsets from the base frequency.
Selecting a Transmission (TX) Frequency
Transmitting on an audio frequency that’s already in use may cause overlapping signals, preventing both signals from being decoded by other users. The TX frequency is indicated by a red line on the spectrum display.
- Tune to the FT8’s RF frequency and set the spectrum span to 10 kHz.
- Observe the Band Activity pane in the left for incoming FT8 signals.
- Look at the waterfall display to find dark, unoccupied audio frequency gaps.
- Adjust the `TX_PITCH` slider to move the red TX line to an unused audio frequency.
Tip: Choose a free frequency between 300 Hz and 3000 Hz. Many radios have crystal filters with limited bandwidth, so they may not hear your signal if you aren’t using split frequency operation.
Responding to a CQ Call
In the console, FT8 decodes will appear every 15 seconds.
- Select a callsign calling CQ to start a QSO. The callsign is automatically copied to the CALL box, their signal report to the RECV box, and their grid location to the EXCH box.
Tip: Decodes appear in small font for more lines to fit onscreen. Drag your finger on the console window if you need to adjust a selection. - Replies are scheduled to transmit when the contact is listening, and scheduled messages appear in gray.
- Messages with your callsign are highlighted in orange.
- After exchanging signal reports, the contact logs automatically.
- If the contact responds to someone else, you’ll see the messages here, indicating that the contact has moved on to another QSO.
- If the caller responds to you, the sBitx will complete the QSO, and the logger will automatically record the callsign and signal reports.
Calling CQ
- Press the **F1 CQ** button to start a CQ during the next cycle.
- Check the band activity for responses, which appear in yellow.
- If **AUTO** is enabled, sBitx will automatically respond to anyone who replies to your CQ. With **AUTO** off, you’ll need to select the CQ reply message manually.
- Use **TX_1ST** to set the CQ time slot. If **ON**, CQ messages transmit during the first and third 15-second slots of the minute. If **OFF**, CQ transmits during the second and fourth slots.
Time Synchronization
FT8 depends on transmission/reception every 15 seconds, so synchronizing sBitx’s Real-time Clock within a second of UTC is crucial. The RTC syncs to within milliseconds when connected to the Internet.
To keep time accurately, connect the sBitx to the Internet via WiFi or Ethernet, then reboot and run the sBitx to see the correct UTC displayed.


Recent Comments